
目录
在日常开发中,我们常常会遇到一些看似简单却暗藏玄机的问题。本文将通过一个实际案例,深入剖析 XXL-JOB 的任务调度执行机制,揭示多线程环境下静态变量可见性问题及其解决方案。
XXL-JOB 执行机制深度解析
某日,在对系统进行常规配置调整时,修改了 Nacos 中的某个配置项。测试验证通过后,却发现 XXL-JOB 定时任务仍在使用旧的配置值执行,而常规方法调用却能正确获取新值。这引发了我们对 XXL-JOB 执行机制的深入探究。
注意
本次使用的 XXL-JOB 源码版本是 2.4.0,源码地址为: https://gitee.com/xuxueli0323/xxl-job/tree/2.4.0/
执行器初始化流程
官网 Demo 中的启用配置中主要是构建了 XxlJobSpringExecutor 实例对象,接下来我们将焦点转向 XXL-JOB 的执行机制。
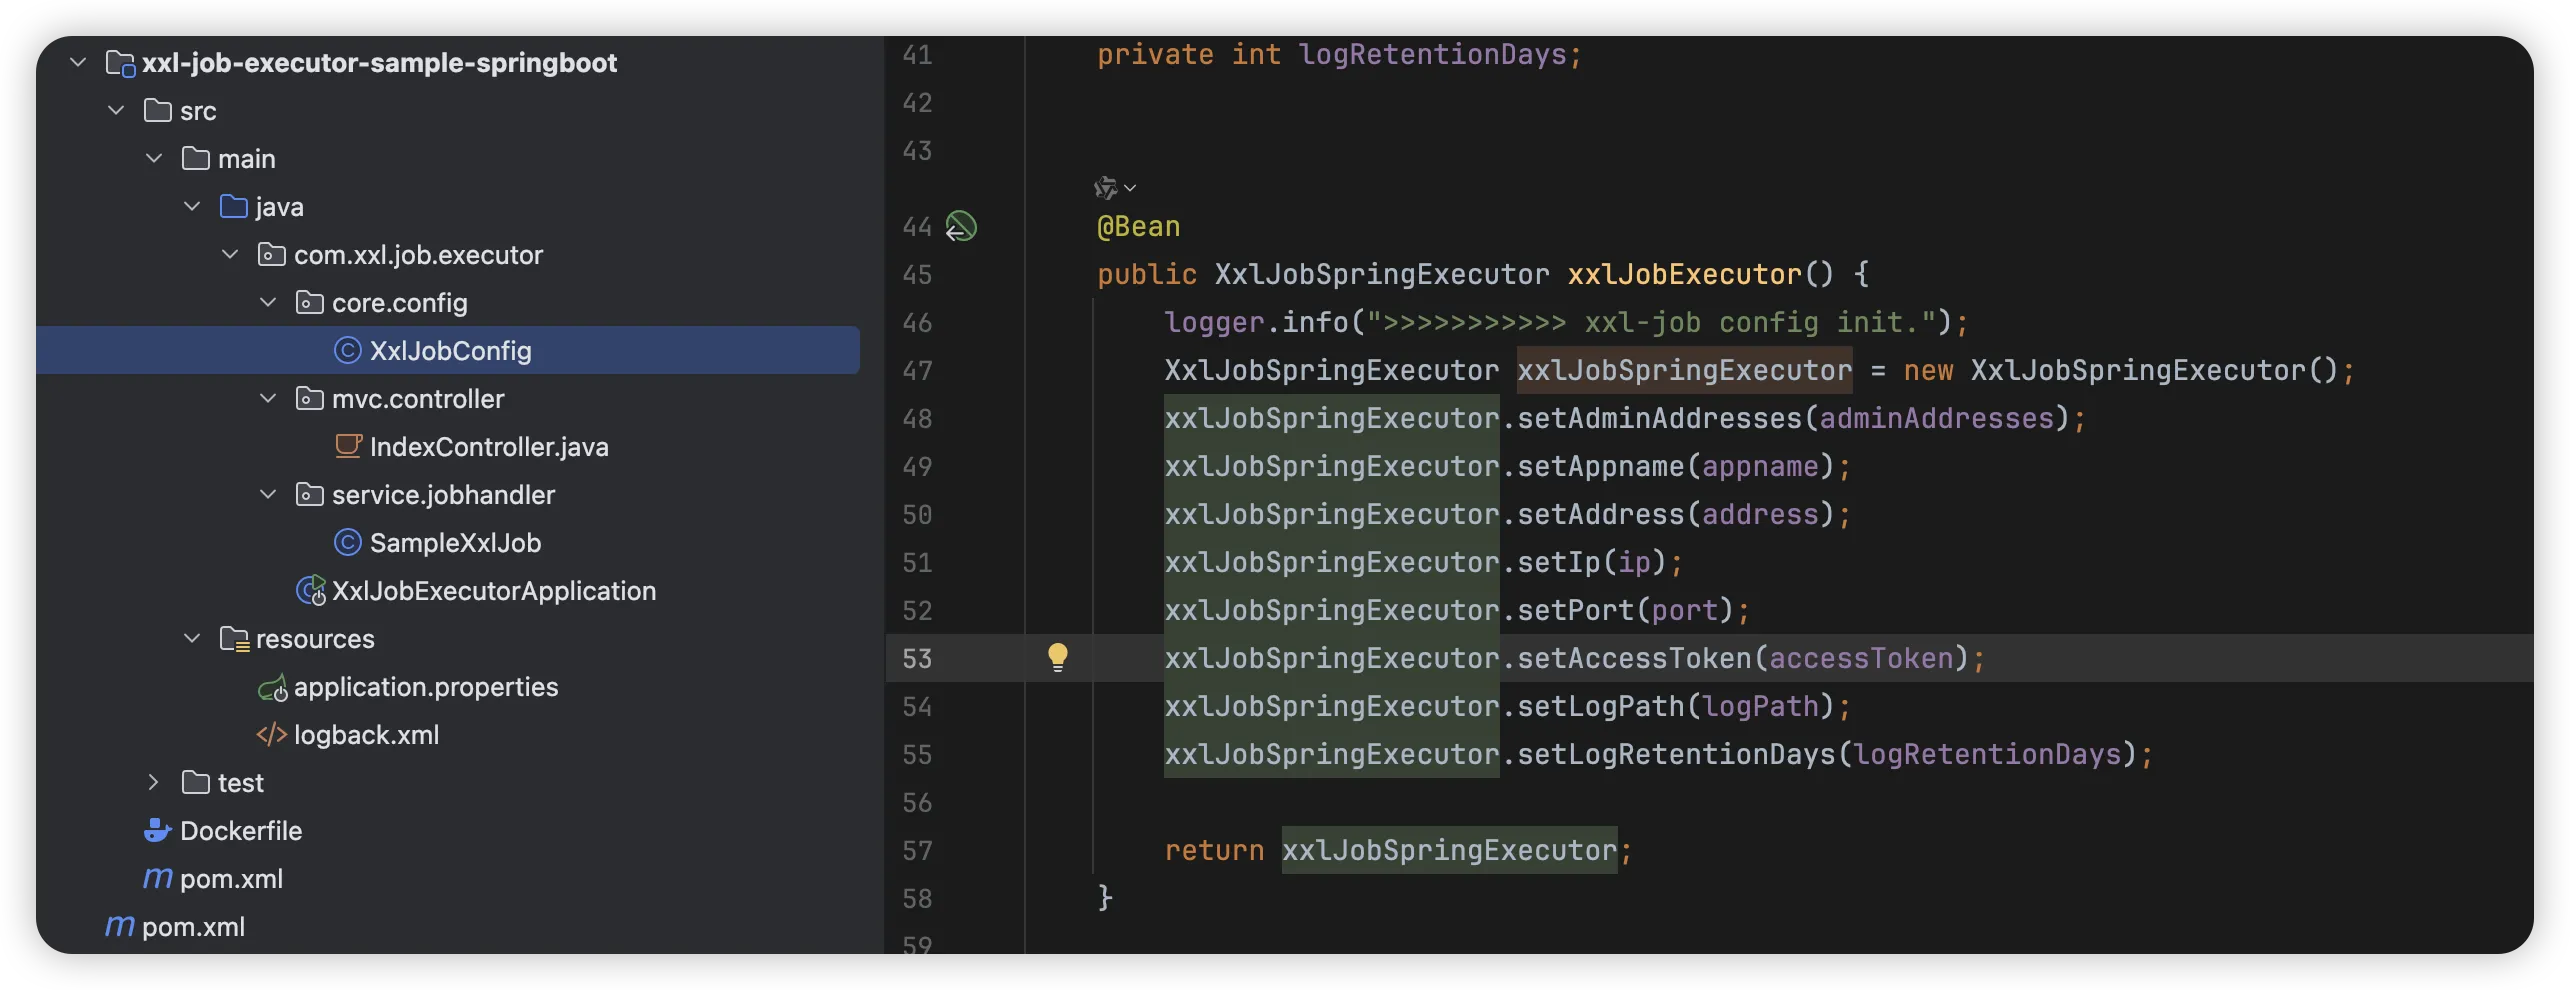
XXL-JOB 通过 XxlJobSpringExecutor 完成执行器初始化,主要实现了 SmartInitializingSingleton #afterSingletonsInstantiated 接口,会在 Spring 容器单例对象创建完成后进行实例化后置处理
javapublic class XxlJobSpringExecutor extends XxlJobExecutor implements ApplicationContextAware, SmartInitializingSingleton, DisposableBean {
    private static final Logger logger = LoggerFactory.getLogger(XxlJobSpringExecutor.class);


    // start
    @Override
    public void afterSingletonsInstantiated() {

        // init JobHandler Repository
        /*initJobHandlerRepository(applicationContext);*/

        // init JobHandler Repository (for method)
        initJobHandlerMethodRepository(applicationContext);

        // refresh GlueFactory
        GlueFactory.refreshInstance(1);

        // super start
        try {
            super.start();
        } catch (Exception e) {
            throw new RuntimeException(e);
        }
    }

    ....
}
关键初始化步骤:
- 扫描带有 @XxlJob 注解的方法
- 注册 JobHandler 处理器
- 启动嵌入式服务器
扫描带有 @XxlJob 注解的方法
我们来看第一个 initJobHandlerMethodRepository 方法源码,开始分析。
- 解析并扫描所有的
BeanDefineition - 先校验是否包含
@Lazy注解,是否一个延迟加载的 Bean, 如果是则不加载,如果不是则继续执行 - 检测每个
BeanDefineition看其内部方法是否包含@XxlJob注解,如果包含则注册JobHandler处理器。
javaprivate void initJobHandlerMethodRepository(ApplicationContext applicationContext) {
    if (applicationContext == null) {
        return;
    }
    // init job handler from method
    String[] beanDefinitionNames = applicationContext.getBeanNamesForType(Object.class, false, true);
    for (String beanDefinitionName : beanDefinitionNames) {

        // get bean
        Object bean = null;
        Lazy onBean = applicationContext.findAnnotationOnBean(beanDefinitionName, Lazy.class);
        if (onBean!=null){
            logger.debug("xxl-job annotation scan, skip @Lazy Bean:{}", beanDefinitionName);
            continue;
        }else {
            bean = applicationContext.getBean(beanDefinitionName);
        }

        // filter method
        Map<Method, XxlJob> annotatedMethods = null;   // referred to :org.springframework.context.event.EventListenerMethodProcessor.processBean
        try {
            annotatedMethods = MethodIntrospector.selectMethods(bean.getClass(),
                    new MethodIntrospector.MetadataLookup<XxlJob>() {
                        @Override
                        public XxlJob inspect(Method method) {
                            return AnnotatedElementUtils.findMergedAnnotation(method, XxlJob.class);
                        }
                    });
        } catch (Throwable ex) {
            logger.error("xxl-job method-jobhandler resolve error for bean[" + beanDefinitionName + "].", ex);
        }
        if (annotatedMethods==null || annotatedMethods.isEmpty()) {
            continue;
        }

        // generate and regist method job handler
        for (Map.Entry<Method, XxlJob> methodXxlJobEntry : annotatedMethods.entrySet()) {
            Method executeMethod = methodXxlJobEntry.getKey();
            XxlJob xxlJob = methodXxlJobEntry.getValue();
            // regist
            registJobHandler(xxlJob, bean, executeMethod);
        }

    }
}
注册 JobHandler 处理器
通过 registJobHandler 方法将注册所有的 JobHandler,后续在执行时,会从此处进行获取
java// ---------------------- job handler repository ----------------------
private static ConcurrentMap<String, IJobHandler> jobHandlerRepository = new ConcurrentHashMap<String, IJobHandler>();
public static IJobHandler loadJobHandler(String name){
    return jobHandlerRepository.get(name);
}
public static IJobHandler registJobHandler(String name, IJobHandler jobHandler){
    logger.info(">>>>>>>>>>> xxl-job register jobhandler success, name:{}, jobHandler:{}", name, jobHandler);
    return jobHandlerRepository.put(name, jobHandler);
}
启动嵌入式服务器
上述方法中,还是项目启动的初始化阶段,接下来我们继续看下 super.start() 方法,作为 XXL-JOB 执行机制的核心启动实现
java// ---------------------- start + stop ----------------------
public void start() throws Exception {

    // init logpath
    XxlJobFileAppender.initLogPath(logPath);

    // init invoker, admin-client
    initAdminBizList(adminAddresses, accessToken);


    // init JobLogFileCleanThread
    JobLogFileCleanThread.getInstance().start(logRetentionDays);

    // init TriggerCallbackThread
    TriggerCallbackThread.getInstance().start();

    // init executor-server
    initEmbedServer(address, ip, port, appname, accessToken);
}
从注释中可以立马定位到 initEmbedServer ,这是初始化嵌入服务器的方法,我们来看下来看看它都做了哪些事情呢
javaprivate void initEmbedServer(String address, String ip, int port, String appname, String accessToken) throws Exception {

    // fill ip port
    port = port>0?port: NetUtil.findAvailablePort(9999);
    ip = (ip!=null&&ip.trim().length()>0)?ip: IpUtil.getIp();

    // generate address
    if (address==null || address.trim().length()==0) {
        String ip_port_address = IpUtil.getIpPort(ip, port);   // registry-address:default use address to registry , otherwise use ip:port if address is null
        address = "http://{ip_port}/".replace("{ip_port}", ip_port_address);
    }

    // accessToken
    if (accessToken==null || accessToken.trim().length()==0) {
        logger.warn(">>>>>>>>>>> xxl-job accessToken is empty. To ensure system security, please set the accessToken.");
    }

    // start
    embedServer = new EmbedServer();
    embedServer.start(address, port, appname, accessToken);
}
上述代码中根据配置的服务端地址,初始化了 EmbedServer 服务,继续查看 start 方法做了哪些操作呢
javapublic void start(final String address, final int port, final String appname, final String accessToken) {
    executorBiz = new ExecutorBizImpl();
    thread = new Thread(new Runnable() {
        @Override
        public void run() {
            // param
            EventLoopGroup bossGroup = new NioEventLoopGroup();
            EventLoopGroup workerGroup = new NioEventLoopGroup();
            ThreadPoolExecutor bizThreadPool = new ThreadPoolExecutor(
                    0,
                    200,
                    60L,
                    TimeUnit.SECONDS,
                    new LinkedBlockingQueue<Runnable>(2000),
                    new ThreadFactory() {
                        @Override
                        public Thread newThread(Runnable r) {
                            return new Thread(r, "xxl-job, EmbedServer bizThreadPool-" + r.hashCode());
                        }
                    },
                    new RejectedExecutionHandler() {
                        @Override
                        public void rejectedExecution(Runnable r, ThreadPoolExecutor executor) {
                            throw new RuntimeException("xxl-job, EmbedServer bizThreadPool is EXHAUSTED!");
                        }
                    });
            try {
                // start server
                ServerBootstrap bootstrap = new ServerBootstrap();
                bootstrap.group(bossGroup, workerGroup)
                        .channel(NioServerSocketChannel.class)
                        .childHandler(new ChannelInitializer<SocketChannel>() {
                            @Override
                            public void initChannel(SocketChannel channel) throws Exception {
                                channel.pipeline()
                                        .addLast(new IdleStateHandler(0, 0, 30 * 3, TimeUnit.SECONDS))  // beat 3N, close if idle
                                        .addLast(new HttpServerCodec())
                                        .addLast(new HttpObjectAggregator(5 * 1024 * 1024))  // merge request & reponse to FULL
                                        .addLast(new EmbedHttpServerHandler(executorBiz, accessToken, bizThreadPool));
                            }
                        })
                        .childOption(ChannelOption.SO_KEEPALIVE, true);

                // bind
                ChannelFuture future = bootstrap.bind(port).sync();

                logger.info(">>>>>>>>>>> xxl-job remoting server start success, nettype = {}, port = {}", EmbedServer.class, port);

                // start registry
                startRegistry(appname, address);

                // wait util stop
                future.channel().closeFuture().sync();

            } catch (InterruptedException e) {
                logger.info(">>>>>>>>>>> xxl-job remoting server stop.");
            } catch (Exception e) {
                logger.error(">>>>>>>>>>> xxl-job remoting server error.", e);
            } finally {
                // stop
                try {
                    workerGroup.shutdownGracefully();
                    bossGroup.shutdownGracefully();
                } catch (Exception e) {
                    logger.error(e.getMessage(), e);
                }
            }
        }
    });
    thread.setDaemon(true);    // daemon, service jvm, user thread leave >>> daemon leave >>> jvm leave
    thread.start();
}
上述源码中新建了一个线程,其主要是创建线程池,在这基于 Netty 框架实现了一个轻量级的嵌入式 HTTP 服务器,主要负责:
- 接收调度中心的远程调用请求
- 解析并分发请求到具体的业务处理器
- 执行任务相关的操作(如运行、停止、日志查询等)
- 向调度中心注册执行器信息
来看下其 Netty 处理器方法,主要看自定义的实现类 EmbedHttpServerHandler,该处理器是整个服务器的核心,负责解析请求并分发到相应的业务方法,来看下它是如何接受到服务端的调度请求,又是如何处理任务的
javapublic static class EmbedHttpServerHandler extends SimpleChannelInboundHandler<FullHttpRequest> {
private static final Logger logger = LoggerFactory.getLogger(EmbedHttpServerHandler.class);
private ExecutorBiz executorBiz;
private String accessToken;
private ThreadPoolExecutor bizThreadPool;
public EmbedHttpServerHandler(ExecutorBiz executorBiz, String accessToken, ThreadPoolExecutor bizThreadPool) {
this.executorBiz = executorBiz;
this.accessToken = accessToken;
this.bizThreadPool = bizThreadPool;
}
@Override
protected void channelRead0(final ChannelHandlerContext ctx, FullHttpRequest msg) throws Exception {
// request parse
//final byte[] requestBytes = ByteBufUtil.getBytes(msg.content()); // byteBuf.toString(io.netty.util.CharsetUtil.UTF_8);
String requestData = msg.content().toString(CharsetUtil.UTF_8);
String uri = msg.uri();
HttpMethod httpMethod = msg.method();
boolean keepAlive = HttpUtil.isKeepAlive(msg);
String accessTokenReq = msg.headers().get(XxlJobRemotingUtil.XXL_JOB_ACCESS_TOKEN);
// invoke
bizThreadPool.execute(new Runnable() {
@Override
public void run() {
// do invoke
Object responseObj = process(httpMethod, uri, requestData, accessTokenReq);
// to json
String responseJson = GsonTool.toJson(responseObj);
// write response
writeResponse(ctx, keepAlive, responseJson);
}
});
}
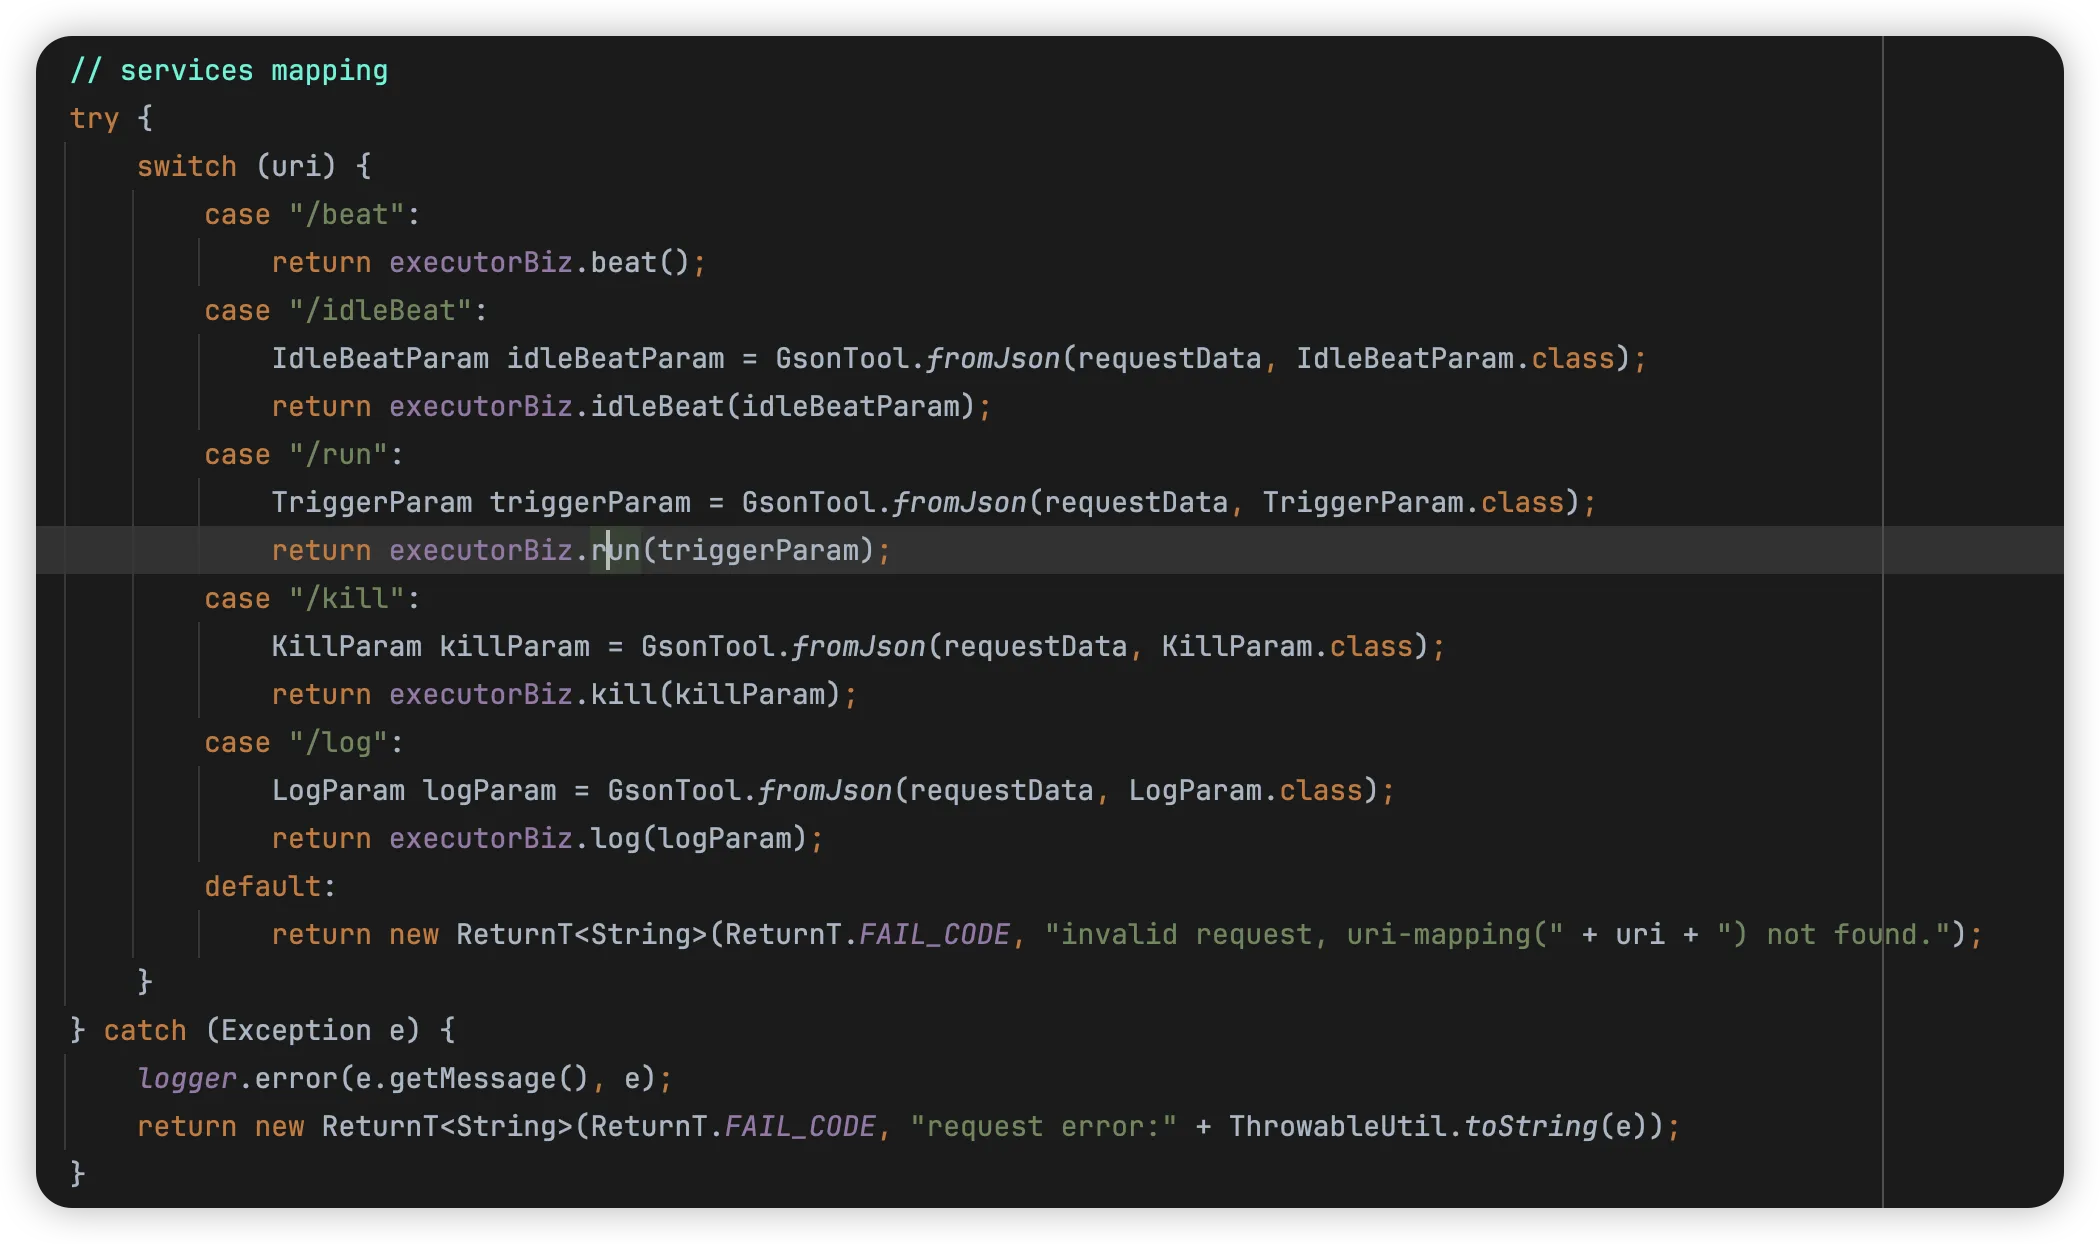
private Object process(HttpMethod httpMethod, String uri, String requestData, String accessTokenReq) {
// valid
if (HttpMethod.POST != httpMethod) {
return new ReturnT<String>(ReturnT.FAIL_CODE, "invalid request, HttpMethod not support.");
}
if (uri == null || uri.trim().length() == 0) {
return new ReturnT<String>(ReturnT.FAIL_CODE, "invalid request, uri-mapping empty.");
}
if (accessToken != null
&& accessToken.trim().length() > 0
&& !accessToken.equals(accessTokenReq)) {
return new ReturnT<String>(ReturnT.FAIL_CODE, "The access token is wrong.");
}
// services mapping
try {
switch (uri) {
case "/beat":
return executorBiz.beat();
case "/idleBeat":
IdleBeatParam idleBeatParam = GsonTool.fromJson(requestData, IdleBeatParam.class);
return executorBiz.idleBeat(idleBeatParam);
case "/run":
TriggerParam triggerParam = GsonTool.fromJson(requestData, TriggerParam.class);
return executorBiz.run(triggerParam);
case "/kill":
KillParam killParam = GsonTool.fromJson(requestData, KillParam.class);
return executorBiz.kill(killParam);
case "/log":
LogParam logParam = GsonTool.fromJson(requestData, LogParam.class);
return executorBiz.log(logParam);
default:
return new ReturnT<String>(ReturnT.FAIL_CODE, "invalid request, uri-mapping(" + uri + ") not found.");
}
} catch (Exception e) {
logger.error(e.getMessage(), e);
return new ReturnT<String>(ReturnT.FAIL_CODE, "request error:" + ThrowableUtil.toString(e));
}
}
/**
* write response
*/
private void writeResponse(ChannelHandlerContext ctx, boolean keepAlive, String responseJson) {
// write response
FullHttpResponse response = new DefaultFullHttpResponse(HttpVersion.HTTP_1_1, HttpResponseStatus.OK, Unpooled.copiedBuffer(responseJson, CharsetUtil.UTF_8)); // Unpooled.wrappedBuffer(responseJson)
response.headers().set(HttpHeaderNames.CONTENT_TYPE, "text/html;charset=UTF-8"); // HttpHeaderValues.TEXT_PLAIN.toString()
response.headers().set(HttpHeaderNames.CONTENT_LENGTH, response.content().readableBytes());
if (keepAlive) {
response.headers().set(HttpHeaderNames.CONNECTION, HttpHeaderValues.KEEP_ALIVE);
}
ctx.writeAndFlush(response);
}
@Override
public void channelReadComplete(ChannelHandlerContext ctx) throws Exception {
ctx.flush();
}
@Override
public void exceptionCaught(ChannelHandlerContext ctx, Throwable cause) {
logger.error(">>>>>>>>>>> xxl-job provider netty_http server caught exception", cause);
ctx.close();
}
@Override
public void userEventTriggered(ChannelHandlerContext ctx, Object evt) throws Exception {
if (evt instanceof IdleStateEvent) {
ctx.channel().close(); // beat 3N, close if idle
logger.debug(">>>>>>>>>>> xxl-job provider netty_http server close an idle channel.");
} else {
super.userEventTriggered(ctx, evt);
}
}
}
// ---------------------- registry ----------------------
public void startRegistry(final String appname, final String address) {
// start registry
ExecutorRegistryThread.getInstance().start(appname, address);
}
public void stopRegistry() {
// stop registry
ExecutorRegistryThread.getInstance().toStop();
}
处理器中最核心的就是 channelRead0 方法,这是 Netty 服务读取的数据入口,其主要做了以下操作:
- 解析请求数据(URI、方法、参数、访问令牌)
- 提交到业务线程池异步处理
- 根据 URI 路径调用不同的业务方法,通过
process方法来处理请求信息
通过 ExecutorBizImpl 实现具体的业务逻辑:
- 心跳检测(/beat):简单返回成功状态,用于调度中心检测执行器是否在线
- 空闲检测(/idleBeat):检查指定任务是否正在运行
- 运行任务(/run):启动一个新的任务执行线程
- 终止任务(/kill):中断正在运行的任务
- 查看日志(/log):读取任务执行日志
关键技术点
- 线程模型设计
javaThreadPoolExecutor bizThreadPool = new ThreadPoolExecutor(
    0,
    200,
    60L,
    TimeUnit.SECONDS,
    new LinkedBlockingQueue<Runnable>(2000),
    // ...
);
- 使用可伸缩的线程池处理业务请求
- 最大支持200个线程,2000个排队任务
- 空闲线程60秒后回收
- 请求异步处理
javabizThreadPool.execute(new Runnable() {
    @Override
    public void run() {
        // do invoke
        Object responseObj = process(httpMethod, uri, requestData, accessTokenReq);
        // ...
    }
});
采用异步处理方式提高并发性能,避免阻塞 Netty 的 I/O 线程。
- 安全验证机制
javaif (accessToken != null
    && accessToken.trim().length() > 0
    && !accessToken.equals(accessTokenReq)) {
    return new ReturnT<String>(ReturnT.FAIL_CODE, "The access token is wrong.");
}
通过访问令牌机制保证接口安全性。
最后就是执行器注册机制
- 通过 ExecutorRegistryThread 向调度中心注册执行器信息
- 定期发送注册信息以维持在线状态
- 服务器停止时取消注册
上述的大流程已经清晰了,我们再来看下 HTTP 服务器中调用 /url 接口,其 ExecutorBizImpl #run 方法中是如何调用到定时任务的 job method 方法的,以下就是源码实现
java@Override
public ReturnT<String> run(TriggerParam triggerParam) {
    // load old:jobHandler + jobThread
    JobThread jobThread = XxlJobExecutor.loadJobThread(triggerParam.getJobId());
    IJobHandler jobHandler = jobThread!=null?jobThread.getHandler():null;
    String removeOldReason = null;

    // valid:jobHandler + jobThread
    GlueTypeEnum glueTypeEnum = GlueTypeEnum.match(triggerParam.getGlueType());
    if (GlueTypeEnum.BEAN == glueTypeEnum) {

        // new jobhandler
        IJobHandler newJobHandler = XxlJobExecutor.loadJobHandler(triggerParam.getExecutorHandler());

        // valid old jobThread
        if (jobThread!=null && jobHandler != newJobHandler) {
            // change handler, need kill old thread
            removeOldReason = "change jobhandler or glue type, and terminate the old job thread.";

            jobThread = null;
            jobHandler = null;
        }

        // valid handler
        if (jobHandler == null) {
            jobHandler = newJobHandler;
            if (jobHandler == null) {
                return new ReturnT<String>(ReturnT.FAIL_CODE, "job handler [" + triggerParam.getExecutorHandler() + "] not found.");
            }
        }

    } else if (GlueTypeEnum.GLUE_GROOVY == glueTypeEnum) {

        // valid old jobThread
        if (jobThread != null &&
                !(jobThread.getHandler() instanceof GlueJobHandler
                    && ((GlueJobHandler) jobThread.getHandler()).getGlueUpdatetime()==triggerParam.getGlueUpdatetime() )) {
            // change handler or gluesource updated, need kill old thread
            removeOldReason = "change job source or glue type, and terminate the old job thread.";

            jobThread = null;
            jobHandler = null;
        }

        // valid handler
        if (jobHandler == null) {
            try {
                IJobHandler originJobHandler = GlueFactory.getInstance().loadNewInstance(triggerParam.getGlueSource());
                jobHandler = new GlueJobHandler(originJobHandler, triggerParam.getGlueUpdatetime());
            } catch (Exception e) {
                logger.error(e.getMessage(), e);
                return new ReturnT<String>(ReturnT.FAIL_CODE, e.getMessage());
            }
        }
    } else if (glueTypeEnum!=null && glueTypeEnum.isScript()) {

        // valid old jobThread
        if (jobThread != null &&
                !(jobThread.getHandler() instanceof ScriptJobHandler
                        && ((ScriptJobHandler) jobThread.getHandler()).getGlueUpdatetime()==triggerParam.getGlueUpdatetime() )) {
            // change script or gluesource updated, need kill old thread
            removeOldReason = "change job source or glue type, and terminate the old job thread.";

            jobThread = null;
            jobHandler = null;
        }

        // valid handler
        if (jobHandler == null) {
            jobHandler = new ScriptJobHandler(triggerParam.getJobId(), triggerParam.getGlueUpdatetime(), triggerParam.getGlueSource(), GlueTypeEnum.match(triggerParam.getGlueType()));
        }
    } else {
        return new ReturnT<String>(ReturnT.FAIL_CODE, "glueType[" + triggerParam.getGlueType() + "] is not valid.");
    }

    // executor block strategy
    if (jobThread != null) {
        ExecutorBlockStrategyEnum blockStrategy = ExecutorBlockStrategyEnum.match(triggerParam.getExecutorBlockStrategy(), null);
        if (ExecutorBlockStrategyEnum.DISCARD_LATER == blockStrategy) {
            // discard when running
            if (jobThread.isRunningOrHasQueue()) {
                return new ReturnT<String>(ReturnT.FAIL_CODE, "block strategy effect:"+ExecutorBlockStrategyEnum.DISCARD_LATER.getTitle());
            }
        } else if (ExecutorBlockStrategyEnum.COVER_EARLY == blockStrategy) {
            // kill running jobThread
            if (jobThread.isRunningOrHasQueue()) {
                removeOldReason = "block strategy effect:" + ExecutorBlockStrategyEnum.COVER_EARLY.getTitle();

                jobThread = null;
            }
        } else {
            // just queue trigger
        }
    }

    // replace thread (new or exists invalid)
    if (jobThread == null) {
        jobThread = XxlJobExecutor.registJobThread(triggerParam.getJobId(), jobHandler, removeOldReason);
    }

    // push data to queue
    ReturnT<String> pushResult = jobThread.pushTriggerQueue(triggerParam);
    return pushResult;
}
在这个方法中看到 IJobHandler newJobHandler = XxlJobExecutor.loadJobHandler(triggerParam.getExecutorHandler()) 这么一行,回想起配置类对象构建的第一行代码时,就是使用此 registJobHandler 进行的注册。后续获取 Bean 的 GlueTypeEnum 类型,然后通过注册 Method 方法进行的反射调用。
到这源码就分析完了,纵观全局掌握了 JobHandler 的执行机制。
总结
EmbedServer 采用了经典的嵌入式服务器设计模式,通过 Netty 实现高性能的 HTTP 通信,结合线程池异步处理业务请求,实现了调度中心与执行器之间的高效通信。其设计具有良好的扩展性和稳定性,能够满足分布式任务调度场景的需求。
在使用一门技术时,我们不光要会使用,还要掌握其底层实现原理,同时还要考虑技术点之间的关联性与影响,尤其是并发编程下如何保障三大特性,其次还需要掌握问题的排查思路,学会透过现象看本质,学会理解问题、分析问题并去解决问题。


本文作者:柳始恭
本文链接:
版权声明:本博客所有文章除特别声明外,均采用 BY-NC-SA 许可协议。转载请注明出处!